Mushrooms are exposed to high temperatures to completely or partially eliminate their toxicity, bitter taste or unpleasant odor. It should be remembered that such processing impairs the nutritional quality of the mushrooms, as well as weakens their aroma and taste. Therefore, if possible, it is better not to cook mushrooms at all, but to fry them in their natural, fresh form. This is quite possible with , and young people, as well as many and . Let's say even more: some varieties of mushrooms acquire viscosity after boiling. This happens, for example, with, as well as legs and. It’s worth knowing about these features when preparing mushroom dishes.
But with some mushrooms you can’t do without cooking. You have to sacrifice nutritional value to dissolve harmful substances in the water. These mushrooms include: tremors ( and ), some russula ( and ), milk mushrooms ( and ). They need to be boiled for about 15-30 minutes, and then be sure to pour out the broth. The bitter taste of some mushrooms (and also some) is removed by short cooking (5-15 minutes is enough). But cooking it is generally useless - the bitterness will never go away.
Stage one— primary processing of mushrooms. Consists of several sequential steps:
1) Sort. Different types of mushrooms differ not only in taste, but also in cooking technology. Therefore, pre-sorting will not hurt at all. For example, you can separate mushrooms that need to be boiled from those that can be thrown into the pan fresh. To make it easier to process the mushrooms, it is recommended to arrange them into piles, depending on their size.
2) Clear away debris. Along with the mushrooms, we bring from the forest leaves, pine needles, pieces of moss and twigs that have stuck to the caps and legs. All this inedible debris, of course, needs to be removed - scraped off with a kitchen knife or gently cleaned with a clean cloth. You should be especially careful with mushrooms that are planned to be dried for the winter. Here you can clean the entire surface of the mushroom with a brush without missing a single wrinkle.
3) Peel with a knife. Some parts of the mushroom are definitely not suitable for food. They must be carefully cut with a knife so as not to risk your health. These are, for example, all softened, damaged or darkened areas. If the mushroom is old, then the inside of the cap should be removed. It is recommended to cut off the stem of some mushrooms so that the dish does not turn out sticky. And the cap of late and russula is cleaned - there the skin becomes slimy and bitter during the cooking process.
4) Rinse with running water. The time for washing mushrooms should be short so as not to spoil the taste of this product. If you plan to fry the mushrooms, then just rinse them with cold water. Mushrooms for drying are not washed at all. All other processing methods require a quick wash in cold water and draining in a colander to drain excess liquid. For these purposes, by the way, a sieve or flat board without grooves or depressions is also suitable. Some mushrooms have an uneven surface; dust and sand often collect in their folds. These are hedgehogs, stitches, morels and some others. Naturally, these types need to be washed a little longer to remove all the debris. True, experts say that you still can’t completely get rid of sand with plain water, and they recommend boiling the mushrooms in boiling water for five minutes, and then draining the water and rinsing in a colander.
5) Soak. This is done in order to remove bitter or salty notes from the mushrooms in taste. In this case, it is recommended to change the water once an hour so that harmful substances leave faster. Soaking also helps restore dried mushrooms to their original moisture. This water can be used as a base for mushroom broth.
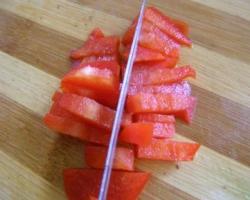
6) Slice. Large mushrooms that cannot be cooked whole require this. Many people separate the caps from the stems and cook them separately to make the dish or canned food in a jar more attractive. The hat is cut into an even number of parts (two, four, six - it all depends on the size). The leg is carefully cut across, making sure that the pieces do not turn out too thick.

Stage II— subsequent (thermal) processing of mushrooms. Includes several methods for your choice:
1) Boiling. You must first boil the water, add salt to your taste and add mushrooms. The foam formed during the cooking process must be removed. Cook the mushrooms for about 15-30 minutes. The finished product is placed in a colander or cooled in cold water.
2) Boiling. Initially, the mushrooms are placed in cold salted water and brought to a boil as quickly as possible. Immediately after boiling, remove the dishes from the stove. The mushrooms can be gradually cooled in the same water in which they were boiled, or doused with cold water. When the mushrooms have cooled, they must be placed in a cloth bag or on a sieve to remove any remaining moisture. You cannot squeeze mushrooms: with this method, useful substances are irretrievably removed from the product along with water.
3) Scalding (or blanching). First, the mushrooms are thoroughly washed, and then placed on a sieve or in a colander and doused with very hot water. After this, immerse it in boiling water for a short time (you can hold it over a pan of boiling water). Blanching is the fastest method of heat treatment. After it, the mushrooms do not break, which is very important if you are going to salt or marinate them. As a rule, saffron milk caps or russulas with a flat or simply large cap are subjected to scalding.
Resume
Not all mushrooms (even edible ones!) are suitable for food. For example, old or overgrown specimens are soft, flabby and have an extremely unappetizing aroma. It’s better not to risk your health and throw away such mushrooms without regret. But the problem is that even young mushrooms quickly deteriorate if they are not processed immediately after returning from the forest. If this is not possible, then processing can be postponed until the next day, but not later. It is advisable to clean the mushrooms from debris, but under no circumstances cut or wash them. It is best to keep the gifts of the forest in a wide basket or other flat container. Mushrooms need coolness and good air ventilation. Therefore, a basement, corridor, shed or underground is the optimal place for storage. In urban conditions, a refrigerator is also suitable. Just don’t forget to set the temperature to +2° - +6°. If you plan to boil the mushrooms, you can fill them with cold water during storage.
What to do if you couldn’t process the mushrooms the next day? There is a proven way to extend their “life”. The product must be washed with cold water, allowed to drain (a colander or sieve is suitable for this purpose), poured with boiling water, and then placed in neat rows in a bowl and sprinkled with table salt. The container must be glass or enamel, and it must be placed on ice. In this form, the mushrooms will retain their freshness for another week.
How to pickle mushrooms at home is not an easy question; it requires certain knowledge and experience. For the winter, wild mushrooms are pickled in glass or enamel containers. The traditional way is to salt in a wooden barrel. Clay pots are unsuitable for pickling: acids and salts spoil the product. You cannot salt in galvanized containers. The barrels must be soaked before salting. Fresh oak tubs are kept under water for ten to twelve days, and the water is changed periodically. After soaking, the barrels are washed with a brush and steamed with hot water with caustic soda diluted in it. Steamed barrels are fumigated with sulfur - this is how microbes in the wood are destroyed. In barrels without soaking, the product may darken. Traditional glass containers or enamel dishes are also thoroughly washed and dried before salting. The enamel on the dishes must be undamaged.
Almost any edible mushrooms are suitable for pickling; for this you will need glass or enamel dishes.
Salting methods in cold water are very simple. Cold pickling is the preparation of mushrooms in cold water without preliminary heat treatment with salt and seasonings.
This method is applicable even in traveling conditions. The following mushrooms can be processed using the cold salting method (mixed or separately):
First, the mushrooms are sorted out, the garbage is thrown away and soaked in cold water for 2 hours. Then the mushroom caps are cleaned with a brush or cloth and washed thoroughly. The stems of peeled mushrooms should be no more than half a centimeter.

To pickle 1 kilogram of mushrooms you will need 40-60 grams of salt.
A layer of salt is poured onto the bottom of pre-washed and dried dishes: 40 or 60 grams per 1 kg of fresh mushrooms.
A layer of mushrooms, from 6 to 10 cm, is placed on the salt, caps down, and sprinkled with salt and spices, currant leaves, dill, bay leaves and garlic. Layers alternate until the container is full.
A pressure is placed on the circle; a stone may be suitable for this. After a couple of days, the mushrooms will sink under pressure and release juice.
Mushrooms can be placed in a large container as they are collected, following the rules of layers. The mushrooms should be completely covered with leaves of dill, horseradish, cherries or currants - this will protect them from mold. If mold does appear, you just need to remove the spoiled mushrooms.
Mushrooms prepared in this way will be ready in 30-40 days.
Milk mushrooms can be salted without leaves and spices. For this you will need:
The milk mushrooms are washed in running water, the spoiled parts are cut off and soaked in water for a day. After draining the water, wash the mushrooms again and fill them with clean water. The action is repeated for five days in a row, refreshing the water daily. Then the mushrooms are cut in half, so that each part has both a cap and a stem. Place the milk mushrooms in the prepared bowl in the same way, in layers, alternating with salt, then create a press. It is necessary to infuse the mushrooms for 3-7 days, stirring daily. Afterwards, the mushrooms can be placed in sterilized jars and rolled up. It is best to store the product in the refrigerator.
Return to contents
This salting method involves heat treatment and is suitable for mushrooms such as:

Before pickling, mushrooms need to be boiled in boiling water for 30 minutes.
They are washed in the same way as for cold salting, then boiled in salted water for 20-30 minutes. Pour out the hot water, drain the mushrooms in a colander and rinse them in cold water. The washed mushrooms are placed in a storage container and salted in a proportion of 45-60 grams of salt per 1 kg. Add dill, onion, garlic and other spices and put under pressure for 8 days. This pickling recipe is suitable for tubular types of mushrooms (butter mushrooms, boletus mushrooms, porcini mushrooms, boletus mushrooms), but it is recommended to cook them for 10 to 15 minutes. Oils for hot salting are washed from pine needles and debris under running water and the sticky film is removed from the caps. Small, young and strong mushrooms are ideal for salting. Large boletus should be cut into several pieces. To salt 1 kg of butter you will need:
Bring salted water to a boil and add mushrooms, stirring, for 15-20 minutes. removing the foam. At the end of cooking, spices are added. The brine should become transparent and the butter should settle to the bottom. Next, they are cooled and placed in a wooden barrel or glass jars. If everything is prepared according to the recipe, then the ratio of brine to boletus will be 1 to 5. After 50 days in brine, the boletus will be ready.
To hot pickle 1 kg of honey mushrooms, you need 40 g of salt and spices to taste. Cleaned and washed honey mushrooms are poured with water and brought to a boil. The hot water and film are drained, everything is washed and filled with water, brought to a boil and the procedure is repeated. After this, cook for 30-40 minutes. after boiling and add spices. Everything is mixed and placed under pressure. Honey mushrooms will be ready in 6 days, after which they can be placed in glass containers and rolled up.
The concept of “blanching” is widely used in cooking today. What does it mean to blanch? The term comes from the French word “blanchir” - to wash, pour boiling water over, bleach. There are also other variants of the word blanch, for example, blanchirit, blanchirit.
Blanching means the process of briefly boiling, scalding or scalding with boiling water any food product, for example, fruits, vegetables, meat, fish. As a result of this process, the product “turns white”, hence the name of the procedure.
We found out what blanching means. Now let's determine its purpose.
The main purpose of blanching is to destroy some of the oxidative and other enzymes in vegetables and fruits. After all, we know that if you cut an apple and leave it on an open surface for a while, after a few minutes it will begin to turn brown. The same thing happens with some mushrooms, for example, boletus - when cut or even lightly pressed, they instantly turn blue. Therefore, you should start blanching no later than 10-12 minutes after you cut the fruit or vegetables.
The blanching technique is used:

When processing vegetables with hot water for a long time, i.e. When cooked, vegetables lose their beneficial properties, so it is best to resort to blanching, as it only takes 2-4 minutes and beneficial vitamins will remain in the products. At the same time, this process kills a significant part of harmful microorganisms.
After blanching, vegetables and fruits become softer, it is easier to peel them, if necessary, their further processing will require much less time and effort.
In addition to all of the above, it should be noted that hot water creates a protective coating on vegetables and fruits, which helps preserve juiciness and taste.
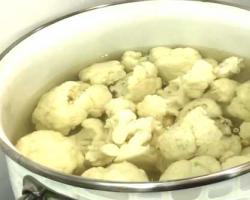
For some vegetables, such as asparagus, broccoli, cauliflower, artichoke, blanching is the only way to process, since the structure of these vegetables is quite delicate and regular cooking can destroy it, so blanching will help maintain its softness and improve the taste.
The main misconception about processing meat before cooking is rinsing it in cold water. After all, in this way all the beneficial substances are washed away. And here blanching will be more useful. You not only disinfect the meat, but also create a protective film so that all the nutrients and beneficial substances remain in the product. This will also preserve the sticky substances, which will improve the taste of the meat.
Blanching vegetables, fruits and herbs before freezing has several advantages. This method partially removes air from the food, which improves food storage. Also, during the blanching process, the action of enzymes slows down, which can destroy the taste, color, structure of vegetables and fruits, which will greatly increase their shelf life.

To prepare vegetables for freezing
Water for blanching should be taken in a ratio of 1:4, i.e. For 1 kilogram of food you should boil 4 liters of water. It should also be noted that the water should slightly cover the blanched vegetables and fruits in order to reduce the loss of beneficial properties to a minimum. After blanching, the products must be cooled under cold water.
Blanched vegetables or fruits can be dipped in boiling water in gauze. Take the prepared vegetables/fruits, cut them into pieces and place them in the middle of the gauze. Do not tie the gauze, take it by the corners and lower it into the pan for the required amount of time. Leave the edges of the gauze on the rim of the pan. After the time has passed, remove the gauze and run under cold water to cool.
The water that remains after blanching fruit contains many useful vitamins, so you can use it to prepare syrups and pour fruit.
We hope this information will be useful to you and you will be satisfied with the results!