Ice cream has long been considered a very refined and expensive delicacy. Ice cream with chocolate, pistachios, fruits, nuts or a regular ice cream will delight you in the hot summer and will also become a wonderful decoration festive table. Today it can be found in almost every store. Thousands of culinary variations of this masterpiece have already been invented. The most natural ingredients are used in our gourmet ice creams. The quality is evidenced by the fact that it can be safely stored in the refrigerator for up to two years at a temperature of -20.
Every year the range is replenished with new tastes. In some countries you can find ice cream flavors of beer, bubblegum, pizza, spinach, tomato, caviar, garlic and avocado. “Soft” ice cream was invented, into which a large volume of air is added.
 A very long time ago, ice cream was made from a mixture of ice and milk. Then fruits and nuts were added. It vaguely resembled a dish similar to sherbet. The basis of any ice dessert includes milk, cream, sugar, eggs, fruit juices, flavors and various additives. Chocolate ice cream is also produced industrially. In composition it does not differ from the usual one. Just to harmonize the taste, it is coated with chocolate glaze.
In France, ice cream is made from almond cream. Whipped cream and fruit are added to it. But before that they are put to sleep a large number sugar and infuse with cherry vodka. Many lovers of this cold delicacy are interested in where the ice cream was invented. There are rumors that the usual ice cream was invented in the city of Plombieres. It was recognized that it contains the maximum percentage of fat.
Making this dessert at home is not that difficult. It is enough to have a special device called an ice cream maker. Why her? An ice cream maker will equally ensure freezing of the prepared mixture without the formation of ice crystals. First you need to buy a milk mixture for ice cream. It consists of milk, sugar, glucose syrup, whey, skim milk powder, dextrose, vanilla flavoring, and also includes E407, E471, E412.

 You can cook without special equipment, only in this case the ratio of heavy cream to milk will be 2:1. This is to ensure that ice crystals do not form in the freezer when finished. The cream needs to be whipped thoroughly. Ice cream made with this cream will be airy and tender.
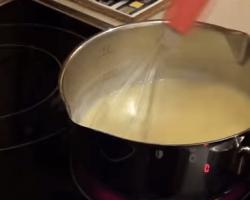
Pour 120 g of sugar into the pan and pour in 200 ml of milk. Add a bag of vanilla sugar there. Next, heat the mixture, but make sure that it does not boil. Then take a glass cup and put four yolks in it. They need to be ground to a homogeneous consistency, preferably with a fork. Excess foam will only harm the cream. Without ceasing to stir the yolks, pour in the milk in a thin stream.
After the yolks have mixed with the milk, pour them back into the pan and place on low heat. Care must be taken to ensure that the yolks do not curdle. You can check the readiness of the cream by running your finger over its surface - if it is ready, a mark will remain. You need to heat the cream until it thickens, stirring all the time. To do this, it is advisable to take a saucepan with a thick bottom. After the cream is cooked, it needs to be cooled.

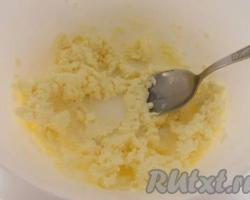
 Beat 400 ml of cream 33-38% fat until stiff. Then mix the resulting cream and cream and place in the freezer for three to four hours. You should remove the ice cream every hour and mix thoroughly with a spoon. For the last time, it is recommended to even beat it with a mixer or blender and put it back in the freezer. After the specified time, the mixture will thicken and become difficult to mix.
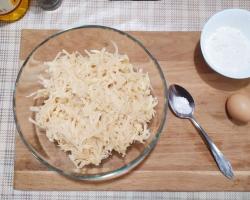
It's time to prepare the supplements. You can use nuts, fruits, syrups, chocolate, and jam as additives. You can divide the ice cream into three equal parts. Add grated dark chocolate to the first, crushed nuts to the second, and put the ice cream back in the refrigerator. Before eating, you need to let the dessert brew for a while. room temperature. Ice cream is placed in special bowls, one scoop of each type. You can sprinkle the remaining chocolate and nuts on top or add orange slices.
It is homemade ice cream that contains iodine, iron, zinc, and potassium.
It is also rich in calcium. But despite beneficial properties, ice cream is considered one of the most high-calorie desserts. Therefore, for those who are watching their figure, chocolate popsicle, like regular ice cream, is not recommended.
Even Louis XIV himself loved this delicacy. The ice cream recipe was a state secret. Its disclosure could lead to punishment comparable to punishment for stealing money from the royal treasury. Over time, interest in ice cream has only increased, and now not a single person in the world can resist this royal dessert.
Homemade ice cream with nuts is an amazingly delicious dessert that is guaranteed to not contain harmful flavoring additives or extra calories. Prepare a cold treat according to the most popular recipes - with nuts and chocolate.
Homemade ice cream with nuts tastes better than store-bought.
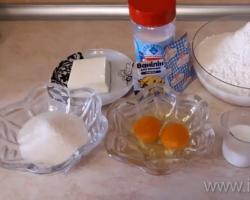
Ingredients
Boiled water 3 tbsp. Salt 0 tsp hazelnuts or other nuts 100 grams Sugar 180 grams Chicken eggs 3 piece(s) Cream 25% fat 380 milliliters
Ice cream does not cook quickly, and this is its only drawback, because it is easier to buy a treat than to wait until it hardens. But taste and quality homemade dessert will definitely justify the investment of time and effort.
Cooking method:
Place the finished mixture in a container or ice cream maker and place in the freezer for 30-40 minutes. After the time has passed, take out the dessert, mix it carefully and put it back in the freezer for 15-20 minutes.
The cold delicacy with chocolate and nut crumbs has a rich taste, and is prepared no more difficult than creamy. To make homemade chocolate ice cream, you will need the following products:
Technology for preparing chocolate dessert:
It is advisable to cool the dessert for at least 2 hours. Before serving, decorate the delicacy with grated chocolate.
Homemade ice cream turns out surprisingly tender, airy and appetizing. It should be stored in the freezer for no more than 2 weeks, but it is unlikely that this delicious dessert will stay there for that long.
Making your own ice cream, especially chocolate ice cream, is not at all difficult. This cold delicacy is becoming one of the most favorite desserts prepared at home, especially since it always turns out excellent and does not require the use of flour. We’ll tell you how to make chocolate ice cream without spoiling the food!
Ingredients:
Process step-by-step production:
Tip: In this recipe, cocoa powder can be replaced with concentrated chocolate syrup in the same amount.

Ingredients:
Algorithm for making ice cream:
Homemade chocolate ice cream is ready!

Ingredients:
Step by step instructions:

Chocolate ice cream with nuts is perhaps the main confectionery classic. On store shelves you can find chocolate ice cream from different manufacturers, but none of them can compare in taste to the homemade dessert that you and I will make, at home, with our own hands and with great love for our loved ones.
However, be careful, its calorie content is quite high - 280 kcal per 100 grams of the finished product.
First of all, of course, we will try for the children. I’ll tell you honestly, when I was a child, what I most wanted to eat was chocolate, and not something like that. No, not because they rarely bought it for me, but because it ran out quickly. But I was always denied supplements, because my mother was afraid that I would catch a cold. That’s why I imagined how one day I would eat a whole bucket of this miracle. Modern children are no exception either. You can be absolutely sure that everything you prepare according to this recipe will be received with delight by both your children and, of course, their friends.


Add two tablespoons of cocoa powder to our ice cream, coarsely chopped and fried in a dry frying pan. walnuts. Mix everything thoroughly, put it in a mold and put it in the freezer.
If a large form is used for ice cream, then during the freezing process it needs to be stirred 2 - 3 times.
If we use small molds, then there is no need to stir the ice cream during the freezing process. That's all done. Chocolate ice cream with nuts, a favorite since childhood, is completely ready. You can see the result in the top photo. Bon appetit!

For a long time I struggled trying to figure out how to make chocolate ice cream in The Sims Freeplay. But it turned out to be simple, but the translators who translated the game into Russian should be hit in the head.

Well, how can you translate this? How am I supposed to figure out that chocolate ice cream is kind of a bumpy road. Damn, it's annoying. But now you don’t have to suffer, because thanks to this article you learned how to make chocolate ice cream in The Sims Freeplay.
The whole difficulty in the game “The Sims free play” is that the [make ice cream] item is simply missing, so for many players it becomes problematic to complete this task. And the translators of the game are to blame, who instead of the word “ice cream” inserted the word pie with the rather unexpected name “Rough Road”.
To pass this level you just need to head to the kitchen stove and select the “Rough Road” option by clicking on it. We are waiting for this “pie” to be ready (baked) and the task to be completed. That's the solution.

In the Sims free play toy, one of the quests requires you to make chocolate ice cream with nuts and marshmallows, but for some reason there is no such item in the menu. So the players try to come up with various tricks to complete the task. Some people bake anything that can be chocolate instead of ice cream, for example, pudding.
Unfortunately, we had to deal with a mistranslation, and the chocolate ice cream in the game is called "Bumpy Road" cake. Therefore, when you go to the stove, you should select a dish with this strange name from the “baking” menu. Now you know all the nuances of preparation and will successfully create the desired chocolate ice cream.
Many people, I think, wanted to make ice cream in the Sims game, because they heard that it was theoretically possible.
But most of them also encountered a problem, or rather, could not find the appropriate item.
So what's the matter?
It turns out that there is a glitchy translation in the game. So, to make ice cream, you actually need to bake a cake, which is called “Rough Road.”
Everything is banal and simple: bring your Sim to the stove, click on it. A menu appears in which you select the “Baking” section, and in it search and find the “Rough Road” item, it is located at the end of the list. The icon looks like this:

The cake, which is actually ice cream, is made and you complete the task.
My question is how and where to make this ice cream?
There is a rough road on the slab.
This site is an aggregator of content from popular social networks. New materials are added automatically. The project administration is not responsible for their content.